Using EdgeDB Auth
EdgeDB Auth is a batteries-included authentication solution for your app built into the EdgeDB server. Here’s how you can integrate it with your app.
Enable extension in your schema
Auth is an EdgeDB extension. To enable it, you will need to add the extension to your app’s schema:
using extension auth;Extension configuration
The best and easiest way to configure the extension for your database is
to use the built-in UI. To access it, run edgedb ui. If you have the
extension enabled in your schema as shown above and have migrated that
schema change, you will see the “Auth Admin” icon in the left-hand toolbar.
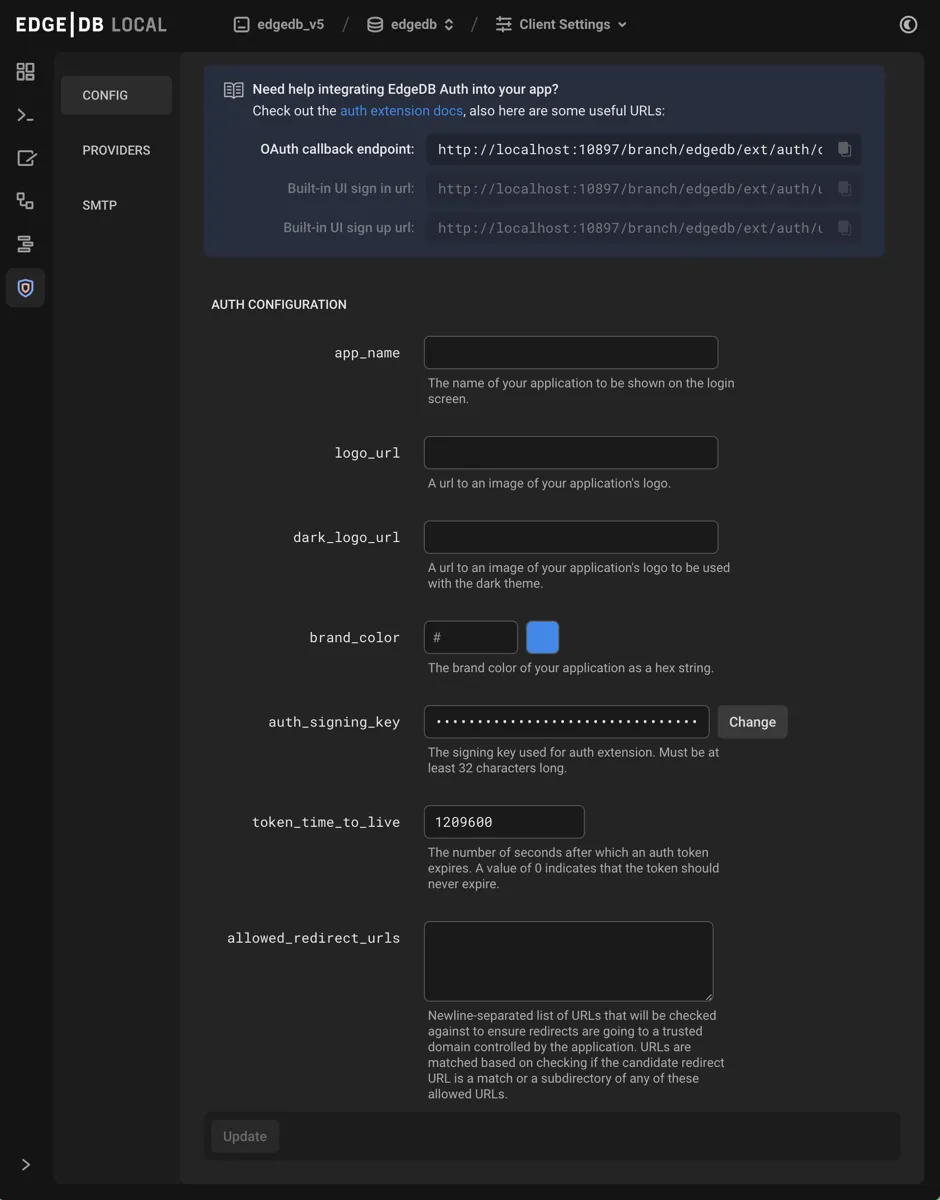
The auth admin UI exposes these values:
logo_url
A URL to an image of your logo for use with a dark theme. This is also used to customize the built-in UI.
brand_color
Your brand color as a hex string. This will be used as the accent color in the built-in UI.
auth_signing_key
The extension uses JSON Web Tokens (JWTs) internally for many operations.
auth_signing_key is the value that is used as a symmetric key for signing
the JWTs. At the moment, the JWTs are not considered “public” API, so there is
no need to save this value for your own application use. It is exposed mainly
to allow rotation.
To configure via query or script:
CONFIGURE CURRENT BRANCH SET
ext::auth::AuthConfig::auth_signing_key := 'F2KHaJfHi9Dzd8+6DI7FB9IFIoJXnhz2rzG/UzCRE7jTtYxqgTHHydc8xnN6emDB3tlR99FvPsyJfcVLVcQ5odSQpceDXplBOP+N14+EBy2mV6rA/7W7azIEKebtr9TVKrpBTMTOLAXo08ZnA6lvjn0VMs95za6Pta7VW62hjcb8jy6yxulvvU5SWnwa0x2z401K0pLK7byDD5eNqgTl40YaeOGoQ0iCkSmGxvLxyQgCIz2IU0zUbBwC9bQsTDORvflunruJznHuMxwbfYo/czQIIGuawU0H+G3GJZ3hecZLQlvwYCyLF37PFQVrcNMtUuGyDy2OyYtYHru2GW5B7Q';
token_time_to_live
This value controls the expiration time on the authentication token’s JSON Web Token. This is effectively the “session” time.
To configure via query or script:
CONFIGURE CURRENT BRANCH SET
ext::auth::AuthConfig::token_time_to_live := <duration>"336 hours";
allowed_redirect_urls
This value is a set of strings that we use to ensure we only redirect to
domains that are under the control of the application using the Auth extension.
We compare any redirect_to URLs against this list. A URL is considered a
“match” if the URL is exactly the same as one on the list, or is a sub-path of
a URL on the list.
For example, if the set includes https://example.com/myapp:
|
URL |
Match |
|---|---|
|
|
✅ |
|
|
✅ |
|
|
✅ |
|
|
✅ |
|
|
Does not match the protocol |
|
|
Does not match the port |
|
|
Does not match the subdomain |
|
|
Does not match the pathname or extend it |
💡 We always allow redirects to the auth extension itself, so you do not need to add it explicitly if, for instance, you are always using the built-in UI.
To configure via query or script:
CONFIGURE CURRENT BRANCH SET
ext::auth::AuthConfig::allowed_redirect_urls := {
    'https://example.com',
    'https://example.com/auth',
    'https://localhost:3000',
    'https://localhost:3000/auth'
};
Enabling authentication providers
In order to use the auth extension, you’ll need to enable at least one of these authentication providers. Providers can be added from the “Providers” section of the admin auth UI by clicking “Add Provider.” This will add a form to the UI allowing for selection of the provider and configuration of the values described below.
You can also enable providers via query. We’ll demonstrate how in each section below.
Email and password
-
require_verification: (Default:true) Iftrue, your application will not be able to retrieve an authentication token until the user has verified their email. Iffalse, your application can retrieve an authentication token, but a verification email will still be sent. Regardless of this setting, you can always decide to limit access or specific features in your application by testing ifext::auth::EmailPasswordFactor.verified_atis set to a date in the past on theext::auth::LocalIdentity.
To enable via query or script:
CONFIGURE CURRENT BRANCH
INSERT ext::auth::EmailPasswordProviderConfig {
    require_verification := false,
};
require_verification defaults to true.
If you use the Email and Password provider, in addition to the
require_verification configuration, you’ll need to configure SMTP to allow
EdgeDB to send email verification and password reset emails on your behalf.
Here is an example of setting a local SMTP server, in this case using a product called Mailpit which is great for testing in development:
CONFIGURE CURRENT BRANCH SET
ext::auth::SMTPConfig::sender := 'hello@example.com';

CONFIGURE CURRENT BRANCH SET
ext::auth::SMTPConfig::host := 'localhost';

CONFIGURE CURRENT BRANCH SET
ext::auth::SMTPConfig::port := <int32>1025;

CONFIGURE CURRENT BRANCH SET
ext::auth::SMTPConfig::security := 'STARTTLSOrPlainText';

CONFIGURE CURRENT BRANCH SET
ext::auth::SMTPConfig::validate_certs := false;
OAuth
We currently support six different OAuth providers:
The instructions for creating an app for each provider can be found on each provider’s developer documentation website, which is linked above. The important things you’ll need to find and make note of for your configuration are the client ID and secret.
Once you select the OAuth provider in the configuration UI, you will need to
provide those values and the additional_scope:
-
client_idThis is assigned to you by the Identity Provider when you create an app with them. -
secretThis is created by the Identity Provider when you create an app with them. -
additional_scopeWe request certain scope from the Identity Provider to fulfill our minimal data needs. You can pass additional scope here in a space-separated string and we will request that additional scope when getting the authentication token from the Identity Provider.We return this authentication token with this scope from the Identity Provider when we return our own authentication token.
You’ll also need to set a callback URL in each provider’s interface. To build
this callback URL, you will need the hostname, port, and branch name of your
database. The branch name is main by default. The hostname and port can
be found running this CLI command:
$
edgedb instance credentialsThis will output a table that includes the hostnames and ports of all your instances. Grab those from the row corresponding to the correct instance for use in your callback URL, which takes on this format:
http[s]://{edgedb_host}[:port]/db/{db_name}/ext/auth/callbackTo enable the Azure OAuth provider via query or script:
CONFIGURE CURRENT BRANCH
INSERT ext::auth::AzureOAuthProvider {
    secret := 'cccccccccccccccccccccccccccccccc',
    client_id := '1597b3fc-b67d-4d2b-b38f-acc256341dbc',
    additional_scope := 'offline_access',
};
To enable any of the others, change AzureOAuthProvider in the example above
to one of the other providers:
-
AppleOAuthProvider -
DiscordOAuthProvider -
GitHubOAuthProvider -
GoogleOAuthProvider -
SlackOAuthProvider
Magic link
Magic link offers only one setting: token_time_to_live. This determines how
long after sending the magic link is valid.
Since magic links rely on email, you must also configure SMTP. For local testing, you can use the same method used for SMTP previously for the email and password provider.
Here is an example of setting a local SMTP server, in this case using a product called Mailpit which is great for testing in development:
CONFIGURE CURRENT DATABASE SET
ext::auth::SMTPConfig::sender := 'hello@example.com';

CONFIGURE CURRENT DATABASE SET
ext::auth::SMTPConfig::host := 'localhost';

CONFIGURE CURRENT DATABASE SET
ext::auth::SMTPConfig::port := <int32>1025;

CONFIGURE CURRENT DATABASE SET
ext::auth::SMTPConfig::security := 'STARTTLSOrPlainText';

CONFIGURE CURRENT DATABASE SET
ext::auth::SMTPConfig::validate_certs := false;
WebAuthn
-
relying_party_origin: This is the URL of the web application handling the WebAuthn request. If you’re using the built-in UI, it’s the origin of the EdgeDB web server. -
require_verification: (Default:true) Iftrue, your application will not be able to retrieve an authentication token until the user has verified their email. Iffalse, your application can retrieve an authentication token, but a verification email will still be sent. Regardless of this setting, you can always decide to limit access or specific features in your application by testing ifext::auth::WebAuthnFactor.verified_atis set to a date in the past on theext::auth::LocalIdentity.
You will need to configure SMTP. For local testing, you can use Mailpit as described in the email/password section.
You will need to configure CORS to allow the client-side script to call the
EdgeDB Auth extension’s endpoints from the web browser. You can do this by
updating the cors_allow_origins configuration in the EdgeDB server
configuration.
Here is an example of setting a local SMTP server, in this case using a product called Mailpit which is great for testing in development:
CONFIGURE CURRENT DATABASE SET
ext::auth::SMTPConfig::sender := 'hello@example.com';

CONFIGURE CURRENT DATABASE SET
ext::auth::SMTPConfig::host := 'localhost';

CONFIGURE CURRENT DATABASE SET
ext::auth::SMTPConfig::port := <int32>1025;

CONFIGURE CURRENT DATABASE SET
ext::auth::SMTPConfig::security := 'STARTTLSOrPlainText';

CONFIGURE CURRENT DATABASE SET
ext::auth::SMTPConfig::validate_certs := false;
Integrating your application
In the end, what we want to end up with is an authentication token
created by EdgeDB that we can set as a global in any authenticated
queries executed from our application, which will set a computed global linked
to an ext::auth::Identity.
💡 If you want your own User type that contains application specific
information like name, preferences, etc, you can link to this
ext::auth::Identity to do so.
You can then use the ext::auth::Identity (or custom User type)
to define access policies and make authenticated queries.
Select your method for detailed configuration:
Example usage
Here’s an example schema that we can use to show how you would use the
auth_token you get back from EdgeDB to make queries against a
protected resource, in this case being able to insert a Post.
using extension auth;

module default {
  global current_user := (
    assert_single((
      select User
      filter .identity = global ext::auth::ClientTokenIdentity
    ))
  );

  type User {
    required name: str;
    required identity: ext::auth::Identity;
  }

  type Post {
    required text: str;
    required author: User;

    access policy author_has_full_access
      allow all
      using (.author ?= global current_user);

    access policy others_read_only
      allow select;
  }
}
Let’s now insert a Post.
const client = createClient().withGlobals({
  "ext::auth::client_token": auth_token,
});

const inserted = await client.querySingle(
  `
  insert Post {
    text := <str>$text,
    author := global current_user,
  }`,
  {
    text: 'if your grave doesnt say "rest in peace" on it you are automatically drafted into the skeleton war'
  }
);
I can even delete it, since I have access through the global:
await client.query(`delete Post filter .id = <str>$id`, {
  id: inserted.id
});